Table of Contents
Introduction
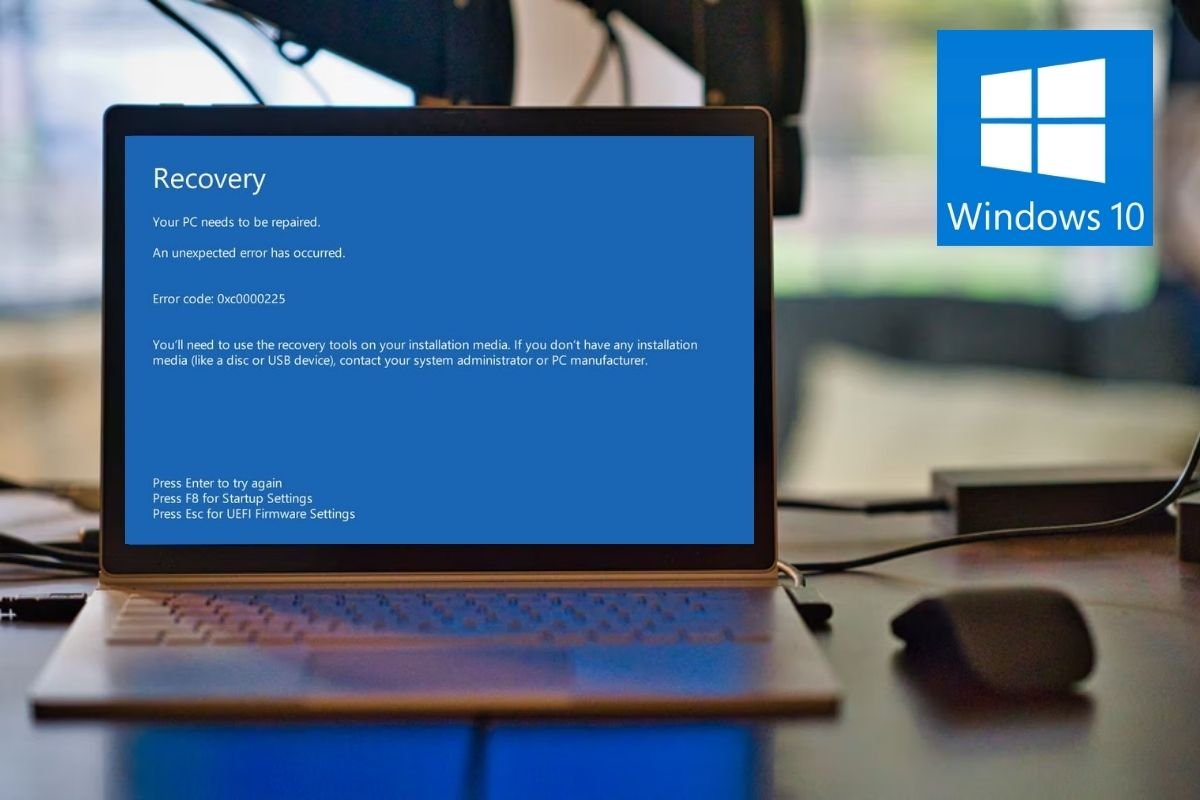
This error indicates that Windows cannot locate the system files required for booting, indicating that the boot configuration data (BCD) is corrupt. This could be due to faulty system files, a defective disc file system configuration, or a hardware failure. Although the Error Code 0xc0000225 is only accompanied by the message “An unexpected error has occurred,” which provides no information, we discovered the difficulties mentioned above to be the root of the problem after troubleshooting.
This problem has been reported by users while updating Windows 10 or crucial components of Windows.
And the computer suddenly rebooted (or there was a power outage), leaving you with the error number 0xc0000225 and a computer that won’t boot.
But don’t worry, that’s why we’re here to help you with this problem, so without further ado, let’s look at how to cure this mistake.

Methods to Fix Error Code 0xc0000225 in Windows 10
Method 1: Run Automatic/Startup Repair to Fix Error Code 0xc0000225
Step 1: Restart your computer after inserting the Windows 10 bootable installation DVD.
Step 2: When asked to boot from a CD or DVD, hit any key, then any key to continue.
Step 3: Click Next after selecting your language options. In the bottom-left corner, click Repair your computer.

Step 4: Click Troubleshoot when Choose an Option screen is displayed. Choose the Advanced option on the Troubleshoot screen.
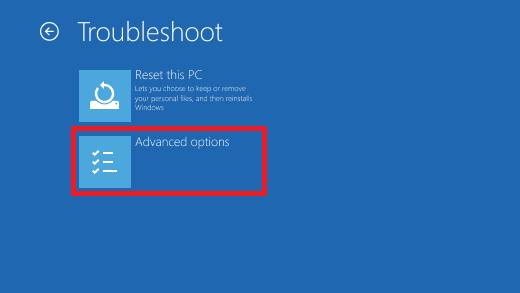
Step 5: Click Automatic Repair or Startup Repair when the Advanced Settings screen is displayed. Await the completion of the Windows Automatic/Startup Repairs.
Method 2: Run System File Checker (SFC) and Check Disk (CHKDSK)
Step 1: Simply click on the command prompt in the Advanced options panel to return to the command prompt using method 1.
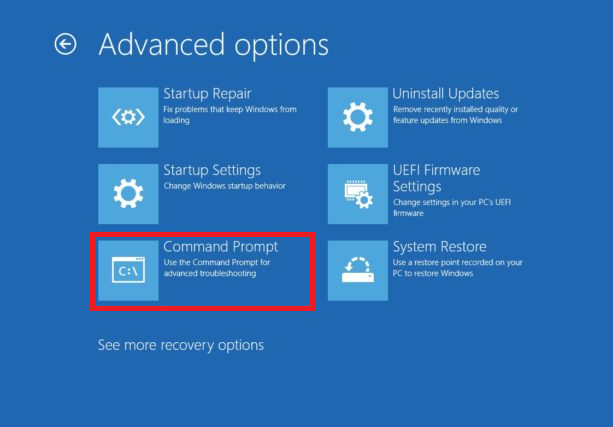
Step 2: In cmd, type the following commands, pressing enter after each one:
sfc /scannow /offbootdir=c:\ /offwindir=c:\windows
chkdsk C: /f /r /x
Note: Make sure that you use the drive letter where Windows is currently installed.

Note: In the above command, C: is the drive on which we want to run the check disc, /f is a flag that tells chkdsk to rectify any faults on the drive, /r tells chkdsk to look for damaged sectors and perform recovery, and /x tells check disc to dismount the drive before starting the procedure.
Step 3: When it asks if you want to schedule the scan for the next system reboot, select Y and press Enter.
Step 4: Restart your computer after exiting the command prompt.
Method 3: Repair the Boot sector or Rebuild BCD
Step 1: Open a command prompt with the Windows installation disc using the technique described above.
Step 2: Now, one by one, input the following commands, pressing enter after each one:
a) bootrec.exe /FixMbr

b) bootrec.exe /FixBoot

c) bootrec.exe /RebuildBcd

Step 3: If the above command does not work, use cmd to run the following commands:
bcdedit /export C:\BCD_Backup
c:
cd boot
attrib bcd -s -h -r
ren c:\boot\bcd bcd.old
bootrec /RebuildBcd
Step 4: Finally, close the cmd window and restart your computer.
Method 4: Manually uninstall recently installed updates
Step 1: To access Settings, press Windows Key + I, then select Update & Security.

Step 2: Select Windows Update from the left-hand menu, then click “View installed update history.” Or, search it in a search bar.

Step 3: On the following screen, select Uninstall updates.

Step 4: Finally, double-click the most recent update in the list of recently installed updates to delete it.
Step 5: Restart your computer to save your modifications.
Method 5: Restart the Windows Update service
Step 1: Using any of the methods given, start your computer in Safe Mode.
Step 2: Press Windows Key + R, then type services.msc and press Enter.
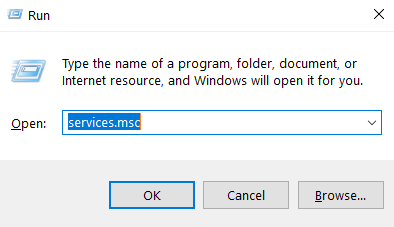
Step 3: Locate the services listed below:
Background Intelligent Transfer Service (BITS)
Cryptographic Service
Windows Update
MSI Installer
Step 4: Select Properties from the context menu by right-clicking on each of them. Ensure that their Startup type is Automatic.

Step 5: If any of the above services have been disabled, be sure to select Start from the Service Status menu.
Step 6: Select Restart from the context menu of the Windows Update service.
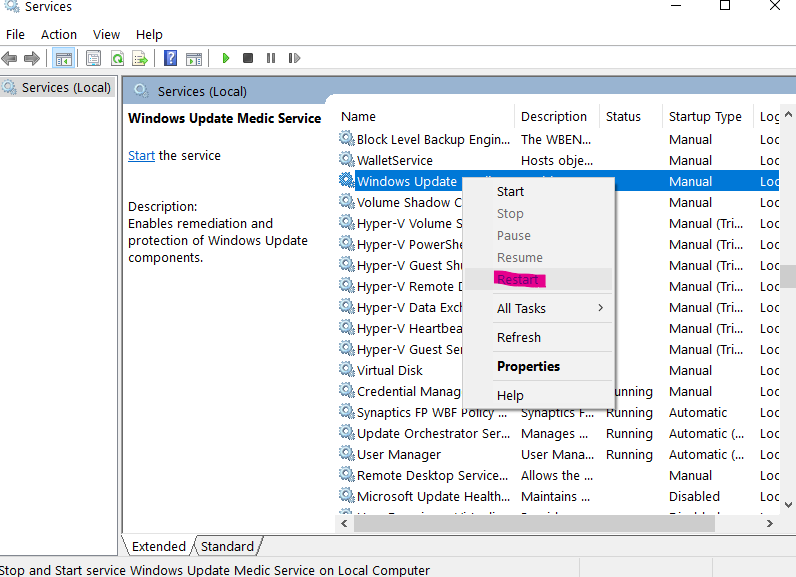
Step 7: Click Apply, then OK, and then restart your computer to save your changes.
Method 6: Restore the MBR
Step 1: With the help of the Windows media creation tool, go to the command prompt and click on the command prompt in the Advanced options panel.

Step 2: In cmd, type the following commands, pressing enter after each one:
bootsect /ntfs60 C:
Step 3: Restart your computer when the preceding procedure is completed.
Method 7: Mark partition as active using Diskpart
Step 1: Open Command Prompt and type “diskpart”.

Step 2: In Diskpart, type the following commands:
(instead of DISKPART)
DISKPART> select disk 1
DISKPART> select partition 1
DISKPART> active
DISKPART> exit
Step 3: Restart to see if the approach worked and apply the modifications.
Conclusion
Hopefully, you successfully fixed Error Code 0xc0000225 in Windows 10, but please leave them in the comments area if you have any questions.


Leave a Reply