Table of Contents
Introduction
You may have encountered the error “File is Damaged and Could Not be Repaired” if you’re using an Adobe PDF reader. The most common issue with this problem is corrupted or virus-infected Adobe core files.
This issue prevents you from accessing the PDF file in question and only displays this error when you try to open it.

Other causes of the error “File is Damaged and Could Not Be Repaired” include Enhanced Security Protection mode, Temporary Internet Files, cache, and an outdated Adobe installation.
So, without spending any time, let’s look at how to properly repair this mistake using the troubleshooting procedures provided below.
Methods to Fix File is Damaged and Could Not Be Repaired
Method 1: Disable Enhanced Security Mode
Step 1: Launch Adobe PDF Reader and select Edit > Preferences.
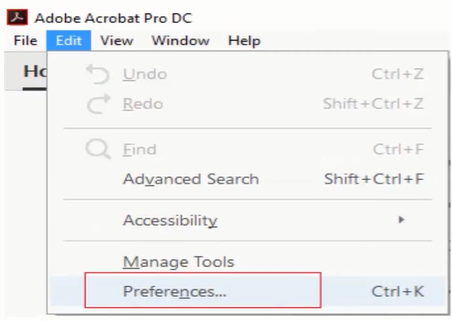
Step 2: Next, select Security from the left-hand option (Enhanced).
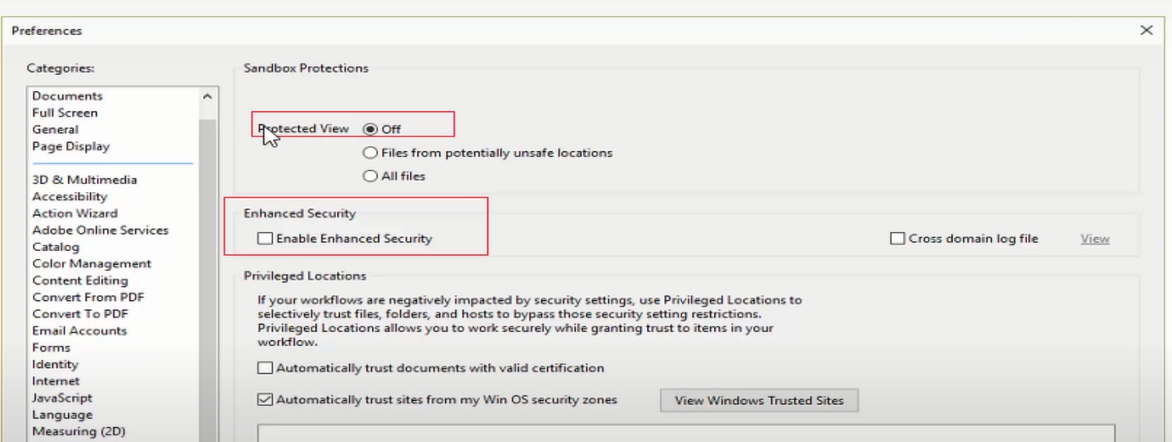
Step 3: Make sure Protected View is turned off and uncheck the option “Enable Enhanced Security.”
Step 4: To save the changes and restart the application, click OK.
This should fix the error File Is Damaged And Cannot Be Repaired.
Method 2: Repair Adobe Acrobat Reader
Step 1: Open Control Panel.

Step 2: Under Programs, select Uninstall an application.

Step 3: Right-click on Adobe Acrobat Reader and select Change.

Step 4: Next, select the Repair option from the drop-down menu.

Step 5: Continue with the repair and then restart your computer.
Step 6: Launch Adobe Acrobat Reader to determine if the problem has been repaired.
Method 3: Check If Adobe is up to date
Step 1: Click Help in the top right corner of Adobe Acrobat PDF Reader.
Step 2: Select “Check for Updates” from the Help submenu.
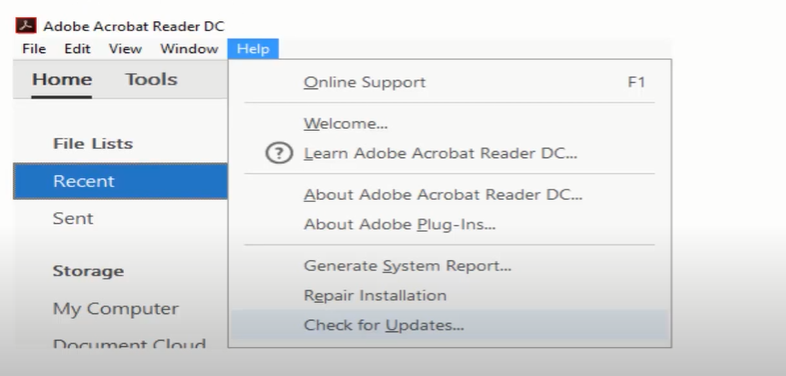
Step 3: Let us check for updates, and if any are detected, ensure that they are installed.
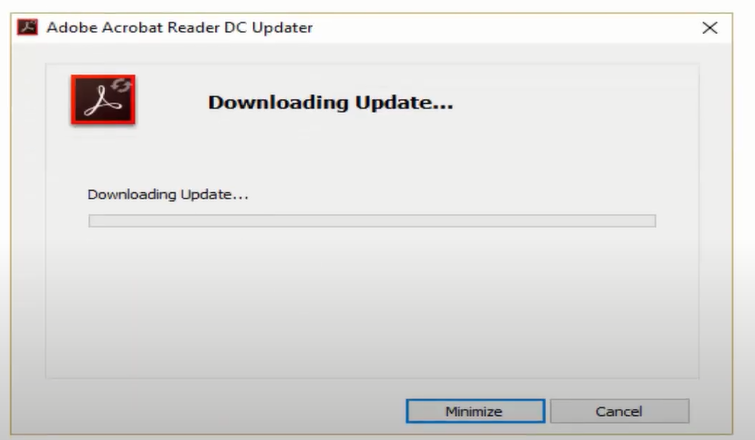
Step 4: To save your changes, restart your computer
Method 4: Clear Temporary Internet files
Step 1: To launch Internet Properties, press Windows Key + R, then type “inetcpl.cpl” (without quotes) and press Enter.

Step 2: In the General tab, select “Delete” under Browsing History.
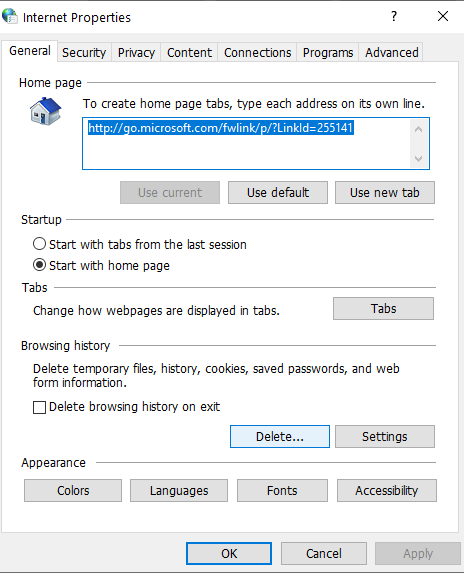
Step 3: Next, double-check the following items:
- Temporary Internet files and website files
- Cookies and website data
- History
- Download History
- Form data
- Passwords
- Tracking Protection, ActiveX Filtering, and Do not track

Step 4: Finally, click Delete and wait for Internet Explorer to remove the Temporary files.
Step 5: Restart Internet Explorer to verify whether the File Is Damaged And Cannot Be Repaired problem has been resolved.
Method 5: Run CCleaner and Malwarebytes
Step 1: Download and install CCleaner. Cleaning the device cache data assists in troubleshooting enhances web page loading times, and boosts.

Step 2: After installation, start the software and let it run its course; this will delete your system’s cache and cookies.
Step 3: To clean your system, go to the Registry tab and double-check that everything is checked.
Step 4: When you’re finished, click the “Scan for Issues” button, and let CCleaner do the rest.
Step 5: CCleaner will display the current Windows Registry issues; click the Fix Selected Issues button to resolve them.
Step 6: When CCleaner asks, “Do you want to backup registry changes?”
Yes, it should be selected.
Step 7: Select “Fix All Selected Issues” after your backup is complete.
Step 8: To save your changes, restart your computer.
You can also try using Malwarebytes. Install and Allow Malwarebytes to check your system for malicious files.
If malware is found, it will be deducted automatically.
Method 6: Uninstall and Install again Adobe PDF reader
Step 1: Select Control Panel by pressing Windows Key + X.

Step 2: Now go to Programs and select Uninstall an application.

Step 3: Right-click on Adobe Acrobat Reader and select Uninstall.

Step 4: Finish the uninstallation and restart your computer.
Step 5: Get the most recent version of Adobe PDF Reader.
Step 6: Restart your computer and re-open Adobe to see if the problem has been repaired.
Conclusion
Hopefully, you were able to resolve the File is Damaged and Could Not Be Repaired error. If you have any questions, please leave them in the comments area.


Leave a Reply