
Table of Contents
Introduction
This error occurs when the computer restarts unexpectedly or when there are power outages. When the computer starts up, it does a routine check to see if the system was shut down properly, and if it wasn’t, the Windows Kernel event ID 41 error message is displayed.
Since Windows doesn’t know why it restarted, there is no stop code or Blue Screen of Death (BSOD) with this problem. And because we don’t know the actual source of the error, it’s tough to pinpoint the issue. Instead, we must analyze the system/software processes that may be causing the error and correct them. There’s a chance it’s not related to software at all, in which case you should look for a broken power supply or power input. This problem could also be caused by a weak or failed power source. Only attempt the steps indicated below once you are certain or have checked all the points mentioned above.
Methods to Fix Windows Kernel Event ID 41 Error
Method 1: Run System File Checker (SFC) and Check Disk (CHKDSK)
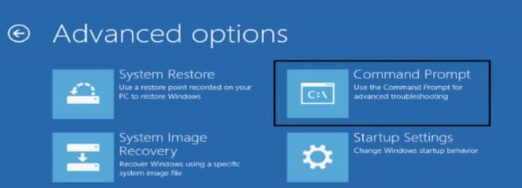
Step 1: Simply click on the command prompt in the Advanced options panel to return to the command prompt using the Windows media creation tool.
Step 2: In cmd, type the following commands, press enter after each command:
sfc /scannow /offbootdir=c:\ /offwindir=c:\windows
chkdsk C: /f /r /x
Note: Make sure that you use the drive letter where Windows is currently installed.
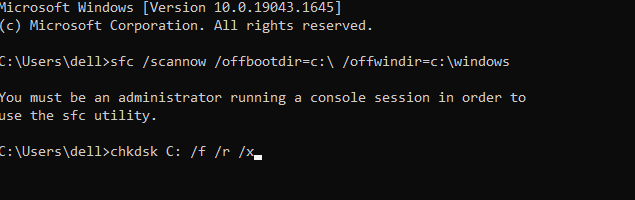
Note: In the above command, C: is the drive on which we want to run check disc, /f is a flag that tells chkdsk to rectify any faults on the drive, /r tells chkdsk to look for damaged sectors and perform recovery, and /x tells check disc to dismount the drive before starting the procedure.
Step 3: If you want to schedule the scan for the next system reboot, select Y and press Enter.
Step 4: Restart your computer after exiting the command prompt.
Method 2: Resolve Windows Update Error
Perform a Windows Update
This type of Windows error can be avoided by running a Windows update, which refreshes the operating system with the latest security patches. Microsoft releases updates steadily to help customers get the most out of their operating system by addressing problems and enhancing performance.
And if your system is due for an update and you haven’t completed it yet, error code 10 is likely the result of the previous version. Here’s how to verify and update it.
Step 1: Go to the Settings icon by clicking “Start.”
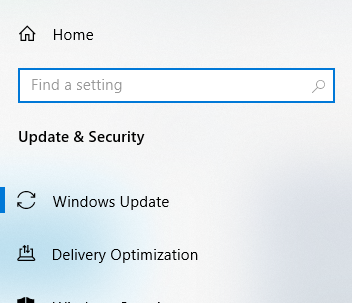
Step 2: Select “Updates & Security” from the Settings menu.
Step 3: Click on “Windows
Update” option from the left panel and click on “Check for Updates” in the
Windows Update pop-up box.
Step 4: A new window appears, indicating that the updates have begun and displaying the installation’s progress bar.
Step 5: When the notification on the screen advises you to restart your computer to complete the installation process, do so.
Perform a Clean Install of Windows
If you’re certain the problem isn’t caused by broken hardware in your computer, a fresh installation of Windows can fix the bothersome ‘operation failed’ error.
A word of caution from us: before fixing hardware issues in your PC, do not install a new operating system or try to reinstall an existing one.
Use this strategy only if the rest of the processes fail to produce beneficial outcomes. You can read how to install Windows Repair here.
Method 3: Perform Clean Boot
Third-party software can sometimes clash with Mouse Drivers, preventing you from using the Wireless Mouse.
To resolve the issue with your wireless mouse not working, you must first conduct a clean boot on your computer and then assess the problem accordingly. To know in detail, visit Microsoft Support.
Method 4: Run MemTest86+
Memtest is superior to the built-in memory test because it works outside of the Windows context and eliminates all possible exceptions of faulty memory.
Step 1: Insert a USB drive into your device.
Step 2: Get the Windows Memtest86 Auto-installer for USB Key and install it.
Step 3: Right-click on the image file you just downloaded and now choose “Extract here.”
Step 4: Open the folder and execute the Memtest86+ USB Installer once it has been extracted.
Step 6: To burn the MemTest86 software, select your plugged-in USB device (This will erase all the content from your USB).
Step 7: Once the previous steps have been completed, connect the USB to the PC that is displaying the Windows Kernel event ID 41 problem.
Step 8: Restart your computer and select boot from the USB flash drive.
Step 9: Memtest86 will start checking your system for memory corruption.
Step 10: If you pass all eight parts of the test, you can be confident that your memory is in good functioning order.
Step 11: If some of the procedures failed, Memtest86 will detect memory corruption, indicating that the source of your Windows Kernel event ID 41 problem is defective or corrupt memory.
Step 12: If faulty memory sectors are discovered, you will need to replace your RAM to fix the Windows Kernel event ID 41 issue.
Method 5: Change URL for DeviceMetadataServiceURL
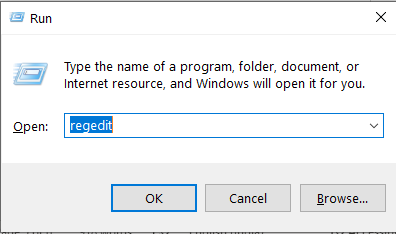
Step 1: To open Registry Editor, press Windows Key + R, then type regedit and press Enter.
Step 2: Now open the Registry Editor and go to the following path:
Computer\HKEY_LOCAL_MACHINE\SOFTWARE\Microsoft\Windows\CurrentVersion\
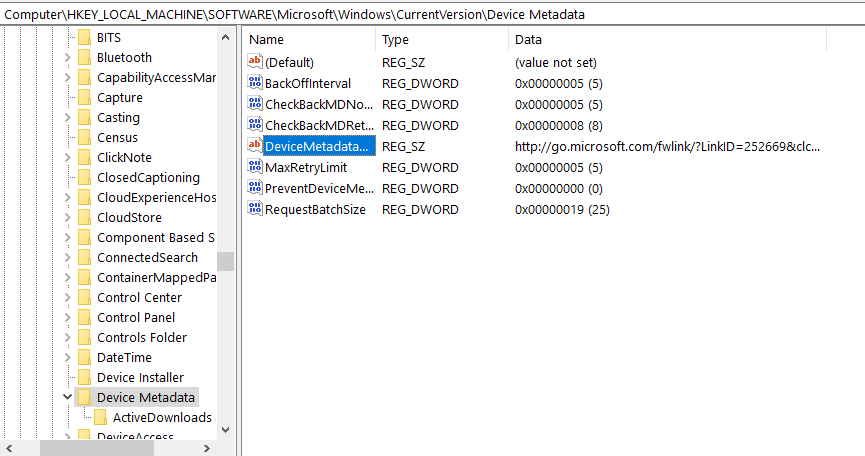
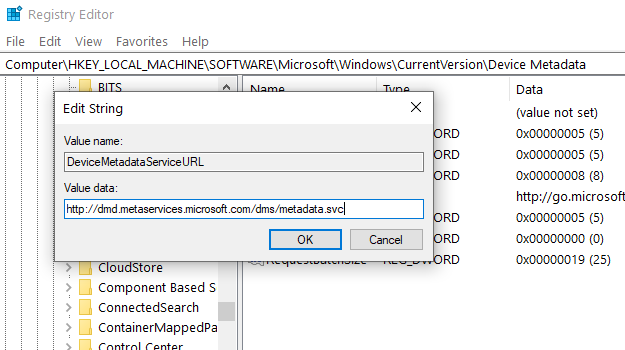
Step 3: Double-click on the DeviceMetadataServiceURL after you’ve discovered it (in the right pane).
Step 4: Make sure to replace the above key-value with:
http://dmd.metaservices.microsoft.com/dms/metadata.svc
Step 5: Close the Registry Editor by clicking Ok. If the Windows Kernel event ID 41 problem is still present, continue.
Conclusion
Hopefully, this article has supplied all the necessary information to resolve the Windows Kernel Event ID 41 issue. If you’re still having trouble fixing the Windows Kernel event ID 41 error, it could be hardware rather than a software issue. In that situation, you may need to hire an outside technician or specialist.
And if you were able to resolve the Windows Kernel event ID 41 problem but still have questions about the instructions, please post them in the comments area.

Leave a Reply