
Table of Contents
Introduction
Before we start fixing the issue “CPUs are not running at its full capacity in Windows 10”, let us start with the prerequisite. CPUs are designed to power your computer to run at maximum speed when there is a heavy load (such as when you are playing a game) and at a low speed when there is no load or a very light load. If your computer’s CPUs aren’t working at maximum speed when doing a big processing operation, this isn’t anything to ignore. This occurs primarily because your computer’s CPUs are sometimes set to less than 100 per cent in the Maximum Processor state option. The speed at which the CPU runs on almost any Windows laptop or desktop varies. You should be aware that the CPU does not always run at maximum speed. It works by following how the operating system distributes the load. However, if the CPU in Windows 11/10 is not working at maximum speed despite a heavy demand, the situation requires attention.
If you wish to double-check, use any CPU stress test tool to see if the speed remains low. Considering laptops rely on batteries, this problem occurs more frequently. Intel processors use speed Stepping Technology. It signifies that the processor’s speed is slowed when you’re completing little chores. However, if this occurs when using heavy software, it could be due to a low battery charge.
Windows will make every effort to keep the computer up and operating for as long as possible. It accomplishes this by slowing down the processor or CPU. However, there are occasions when you are willing to compromise battery life to ensure that the assignment is completed on time. Go for the fixes to remedy the problem, but don’t forget to execute these preliminary workarounds first.
Prerequisite:
- Restart your machine/PC and check if the CPUs are working at full speed by performing a hard task (such as opening a video game).
- Check to see whether your PC has any pending Windows updates. Check to see whether your problem has been resolved after updating your system.
- Run a comprehensive system scan for malware and viruses. Restart your machine/device after the scan and check to see if the CPUs are working at maximum speed.
- If you’re having trouble doing this on a laptop, turn off the battery saver mode. Your laptop should be running at its maximum capacity after disabling the CPUs.

Method To Fix CPUs are Not Running At its Full Capacity in Windows 10/11
Restart your computer and see. Updating your Windows PC, fully scanning your system for viruses, decreasing startup items, disabling Battery Saver Mode, and running Windows in High-Performance Power Mode are simple measures you can take before moving forward.
There is also a possibility that you probably have too many apps running on your computer, which causes it to be slow. This consumes a significant amount of processing power and has an impact on performance and speed.
There are two solutions: first, reduce the number of apps running, and second, increase the RAM and processing capability of your computer. If that’s not the issue, then move forward with the steps mentioned in this article to help you out. One of the suggestions below will undoubtedly assist you.
Following are the methods to fix CPUs are not running at its full capacity in Windows 10/11:
Method 1: Set Maximum processor state to 100%
It’s possible that the CPUs on your computer’s maximum processor status is set to less than 100% at times.
Follow these steps to set the maximum processor state to 100%:
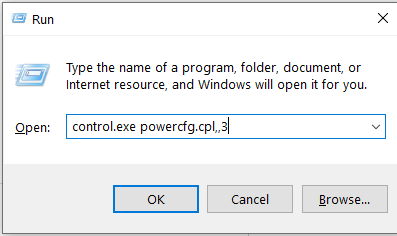
Step 1: Open “Run” by pressing Windows Key + R, then copy and paste the following and hit Enter:
control.exe powercfg.cpl,,3
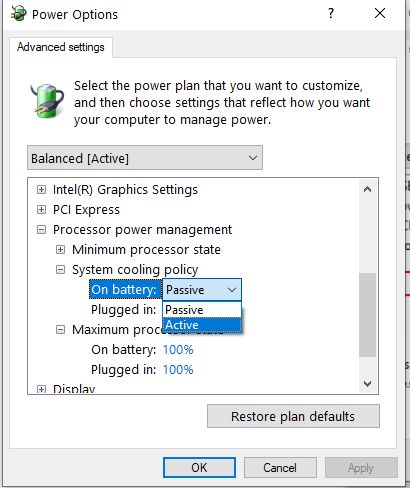
Step 2: Scroll down and expand “Processor power management” and then “Maximum processor state” in the Power Options window.
Step 3: Set the value to “100” in the box next to “Settings.”

Step 4: Then, directly above the ‘Maximum processor state,’ expand the “System cooling policy.”
Step 5: Expand “Settings” and select “Active” from the drop-down menu.
Step 6: Finally, to preserve the changes, click “Apply” and “OK.”
Method 2: Disable the Intelppm registry in Registry Editor
By adjusting the value of the ‘start’ key of the ‘Intelppm’ registry, you can force your CPU to run at full speed all the time. Follow these procedures to modify the value of the “Start” key:
Step 1: Start typing “registry” after pressing the Windows key on your keyboard.
Step 2: Then, in the search result, select “Registry Editor.”

The Registry Editor window will open.
Step 3: In the Registry Editor’s left pane, navigate to this location.
HKEY_LOCAL_MACHINE\SYSTEM\CurrentControlSet\Services\intelppm
Step 4: Now double-click “Start” in the right pane.
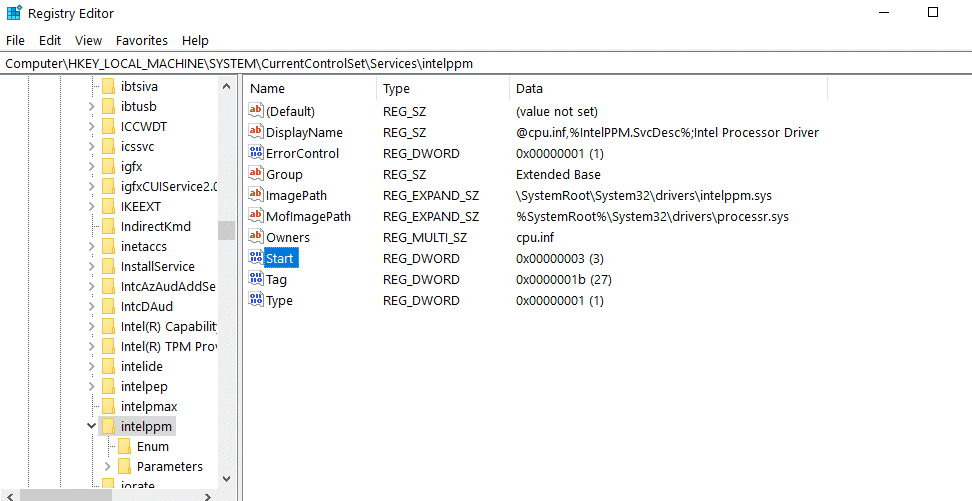
Step 5: Change the “Value data” value to “4”.

To modify the registry’s value, click “OK.”
Method 3: Disable/Update Intel Power Management Driver
When your CPU is under low load (such as when your computer is in sleep mode), it runs at a low rpm, but it speeds up to its maximum capacity when it is under heavy load.
The Intel Power Management Driver is in-charge of this system.
Follow these instructions to disable the Intel Power Management Driver.
Step 1: Select the “Power” symbol from the Windows Icon menu.
Hold down Shift and then click “Restart.” Troubleshooting mode will be activated on your computer.

Step 2: Select “Troubleshoot” and then “Advanced Option” from the drop-down menu.
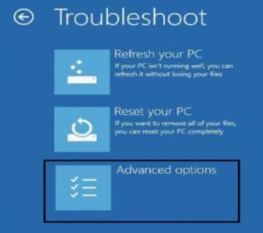
Step 3: Finally, select “Command Prompt.”
Step 4: To go to the directory C:\Windows\System32\driver, copy and paste this command and press Enter.
cd drivers
ren intelppm.sys intelppm.sys.bak
Restart your PC with Windows 10/11 installed. Check to see if the CPUs are running at full speed.
Your issue should now be resolved.
Conclusion
This article highlights all you need to learn about fixing CPUs are not running at its full capacity in Windows 10/11. Hopefully, you were able to fix CPUs not running at their full capacity or maximum speed issue. If you have any more queries or ideas, please leave them in the comments section.
View all fixes related to Windows here.

Leave a Reply