
Table of Contents
Introduction
This is an extremely aggravating Windows 10 issue where the search box or Cortana keeps popping up by itself every few minutes. The search box will repeatedly appear while working on your computer; it is not triggered by your actions and will appear at random.
The problem is with Cortana, which will continue to display for you to search for an app or information on the internet. The search box may appear for various reasons, including default gesture settings, clashing screensavers, Cortana defaults, corrupted windows files, and so on. Thankfully, there are several solutions to this problem, so without further ado, let’s look at how to fix or disable SearchApp.exe using the troubleshooting techniques outlined below in this post.

What is SearchApp.exe?
SearchApp.exe is an executable file connected to Windows search functions, as its name suggests. SearchApp.exe was previously associated with Cortana and Windows 10 search functionality in previous editions of Windows 10. This executable file is combined with Windows search functions in Windows 10 version 2004.
This brings us to two parts of it —
First, if Cortana continues to execute SearchApp.exe, it will drain a significant amount of CPU power due to the CPU’s increased ability to heat up.
Second, because SearchApp.exe has been combined with the Windows search function in the most recent Windows release, removing or even deactivating it can cause problems, particularly with search features.
Before proceeding with the methods to disable or uninstall SearchApp.exe, it is recommended that you first build a restore point.
How To Fix or Disable SearchApp.exe
Method 1: Use CCleaner
Step 1: Download and install CCleaner. Cleaning the device cache data assists in troubleshooting, enhances web page loading times, and boosts.

Step 2: After installation, start the software and let it run its course; this will delete your system’s cache and cookies.
Step 3: To clean your system, go to the Registry tab and double-check that everything is checked.
Step 4: When you’re finished, click the “Scan for Issues” button, and let CCleaner do the rest.
Step 5: CCleaner will display the current Windows Registry issues; click the Fix Selected Issues button to resolve them.
Step 6: When CCleaner asks, “Do you want to backup registry changes?” Yes, it should be selected.
Step 7: Select “Fix All Selected Issues” after your backup is complete.
Step 8: To save your changes, restart your computer.
Method 2: Update Mouse Drivers
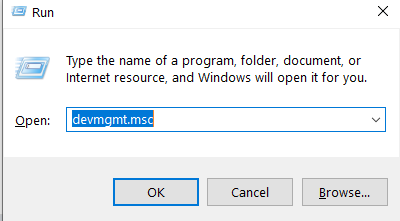
Step 1: To launch Device Manager, press Windows Key + R, type “devmgmt.msc”, and press Enter.

Step 2: Right-click your Wireless Mouse and select Update Driver after expanding Mouse and other pointing devices.

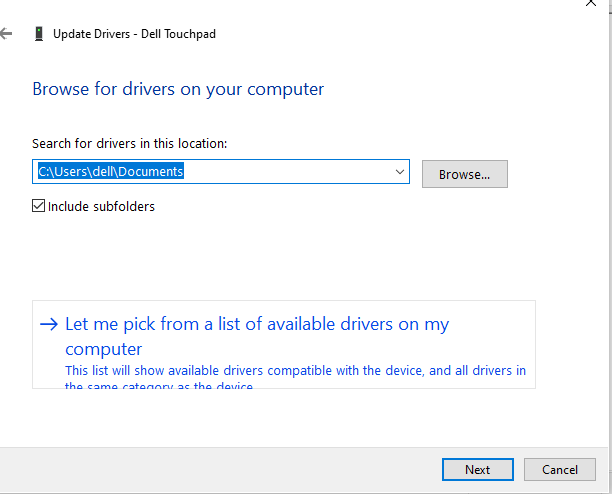
Step 3: Click “Browse my computer for driver software” on the next screen.
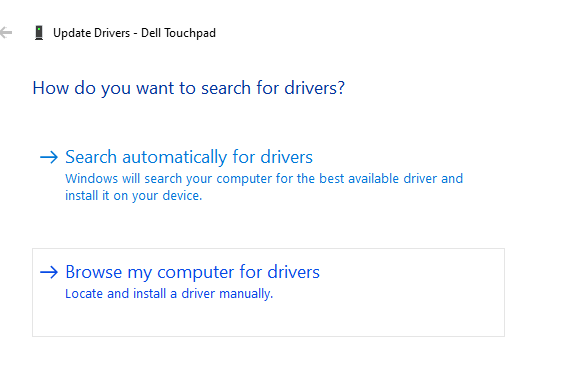
Step 4: Select “Let me choose from a list of device drivers on my computer” from the drop-down menu.
Step 5: Uncheck “Show suitable hardware” and pick one of the devices from the list.
Step 6: To continue, click next, and if prompted for confirmation, pick Yes.
Step 7: Reboot your computer to save your changes, then repeat steps 1-4.
Step 8: Click Next after checking “Show compatible hardware” and selecting the provided driver, preferably a PS/2 Compatible Mouse.
Step 9: Restart your computer to see if the issue is resolved.
Method 3: Disable Gesture settings for Touchpad
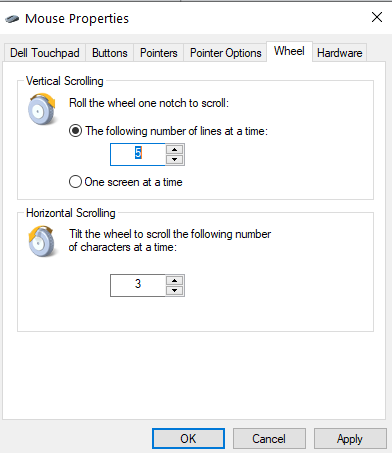
Step 1: To open Mouse Properties, press Windows Key + R, then type main.cpl and press Enter.
Step 2: Go to the Wheel tab and change “The following number of lines at a time” to 5.
Step 3: Click Apply, then go to the Device Settings tab or the Dell Touchpad tab and select Settings.
Step 4: To restore default settings, be sure to click on Default.
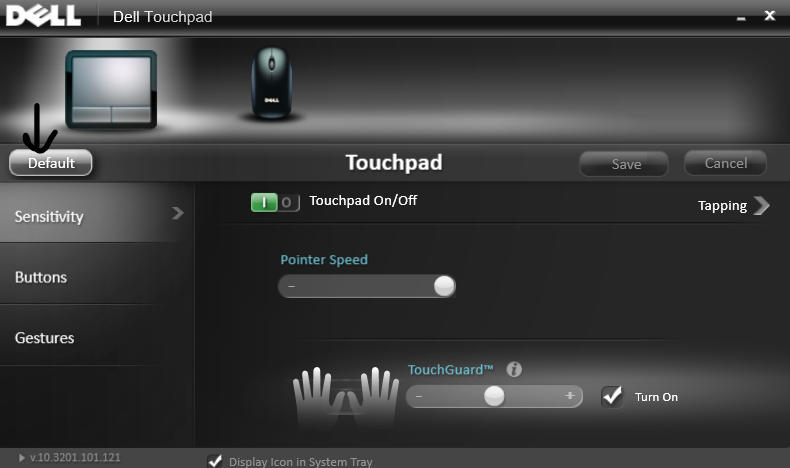
Step 5: Now go to Gestures and make sure Multi-finger gestures are disabled.
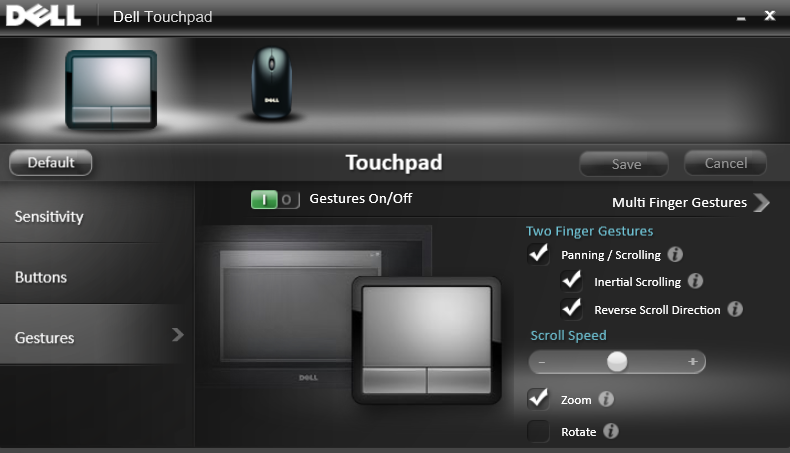
Step 6: Click Apply and then OK.
Step 7: Restart your computer after closing everything.
Method 4: Reinstall Mouse Drivers
Step 1: Press the Windows Key + R keyboard shortcut, then type devmgmt.msc and press Enter.
Step 2: Right-click your wireless mouse and select Uninstall after expanding Mice and other pointing devices.
Step 3: Reboot your computer to save your changes, and Windows will automatically install the device’s default drivers.
Method 5: Run System File Checker (SFC) and Check Disk (CHKDSK)
Step 1: Simply click on the command prompt in the Advanced options panel to return to the command prompt using method 1.

Step 2: In cmd, type the following commands, pressing enter after each one:
sfc /scannow /offbootdir=c:\ /offwindir=c:\windows
chkdsk C: /f /r /x
Note: Make sure that you use the drive letter where Windows is currently installed.
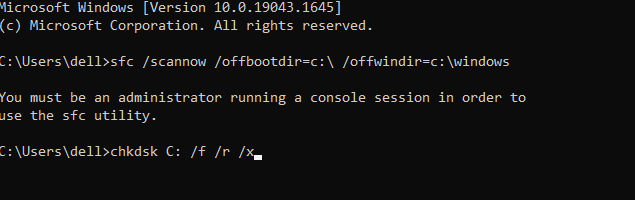
Note: In the above command, C: is the drive on which we want to run check disc, /f is a flag that tells chkdsk to rectify any faults on the drive, /r tells chkdsk to look for damaged sectors and perform recovery, and /x tells check disc to dismount the drive before starting the procedure.
Step 3: When it asks if you want to schedule the scan for the next system reboot, select Y and press Enter.
Step 4: Restart your computer after exiting the command prompt.
Method 6: Perform Clean Boot
Third-party software can sometimes clash with Mouse Drivers, preventing you from using the Wireless Mouse.
To resolve the issue with your wireless mouse not working, you must first conduct a clean boot on your computer and then assess the problem accordingly. To know in detail visit Microsoft Support.
Conclusion
In this article, we have provided all the required details to Fix or Disable SearchApp.exe, if you have any other queries related to this, then let us know in the comment area.

Leave a Reply